User Guide
This guide goes over how Communards can do things like check their Stipend balance, or enter Trip forms & how Accountants can do things like import Bank Statements or add Credit Cards to the Accounting Application.
Everyone should read the First Time User Guide, and Accountants are encourage to read the entire guide.
Communards
The following guides apply to all Communards, both Accountants & Non-Accountants.
First Time User Guide
Using Firefox is highly recommended. Most of the browser testing is done in Firefox, so Chrome may cause some unique UI issues.
If you’re unfamiliar with the Accounts you can make charges too, the homepage of the Accounting Application shows the Chart of Accounts. You can click the different tabs to show different account types. You’re most likely interested in the Accounts under the Expenses tab, although large infrastructure purchases may be found under the Assets tab.
When entering dates, you don’t have to enter leading zeros or the first two digits of the year. 1/5/17 is the same as 01/05/2017.
When entering numbers into the Amount fields of forms, do not enter a dollar sign or comma separators.
When selecting an Account in a form, you can type any part of the Account’s name and/or description. For example, if you don’t know what to charge batteries to, you can type bat into the field and Appliance Maintenance will show up(assuming your Accountants have added batteries to the description of the Appliance Maintenance account). If you have trouble identifying the proper account for an item, tell your Accountant so they can add it to the description.
To save time, you can combine multiple identical charges into a single charge. For example, instead of making 4 $1.50 charges for Toothbrushes, you can make a single $6 charge for Toothbrushes x4.
When in doubt or something out of the ordinary is happening in your entry, leave a comment for your Accountant.
When an appropriate Account doesn’t exist, use Misc Income or Misc Expense and leave a comment.
In form tables, you can press Tab to move to the next field in the row(or down a row if you are on the last field). Enter will move the cursor to the first field of the next row.
On some pages, you will see a Page Guide button attached to the right-side of the page. You can click this for in-depth information about the current page:
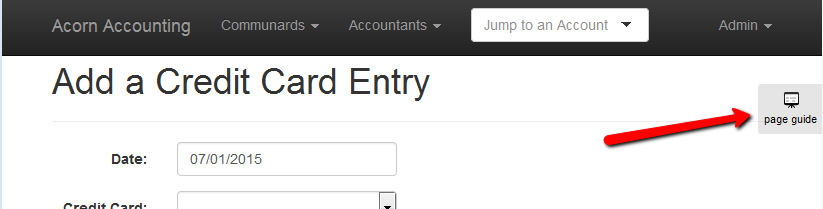
Click the Page Guide button to get a detailed description of any form fields.
You can click the numbers to select a specific hint or press the arrow buttons to go forwards & backwards:
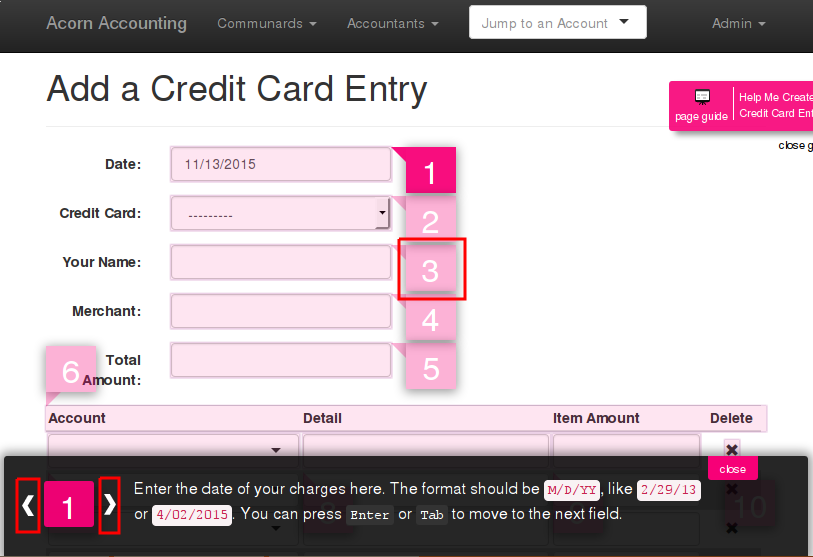
Click the numbers to jump to a hint, click the arrows or arrow keys to scroll through the hints.
Checking Your Stipends & Deposited Asset Balances
Every communard has both a Stipend and a Deposited Assets Account. Stipends are where you monthly stipend is paid, and where the funds for most expenses come from. Deposited Assets include any outside funds you have deposited.
To check the balance of either Account, type your name into the Jump to an Account input in the navigation menu. You should see your Accounts in the dropdown menu, select one of the Accounts to be taken to it’s Details page, which shows a list of deposits and withdrawals.

You can use the Jump to an Account dropdown in the navigation menu to quickly find your Stipend or Deposited Assets Accounts.
You can also find a list of everyone’s stipend or deposited assets, by clicking opening the Communards and clicking Member Stipends or Member Deposited Assets under the View Accounts heading.
Submitting Credit Card Entries
Credit Card Entries are a way for Communards to enter their Credit Card purchases directly into the Accounting system. All entries will be approved by an Accountant before taking effect.
When you make a purchase with a credit card, you should either request/print a receipt or save your receipt as a PDF file.
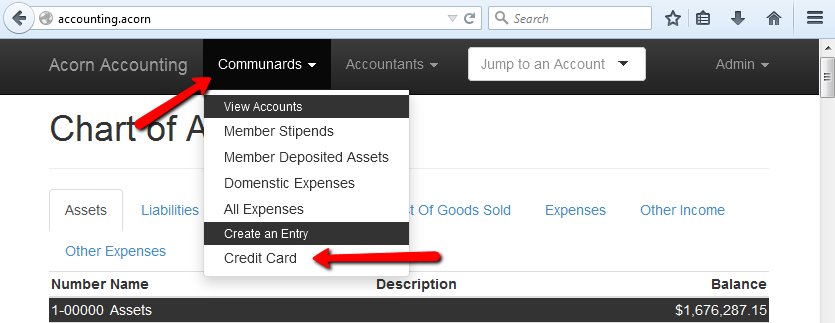
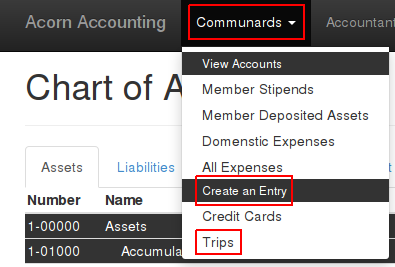
Open up the Accounting Application and in the navigation menu, open the Communards menu and click the Credit Card link under the Create an Entry header:
You will be brought to a blank Credit Card Entry form:
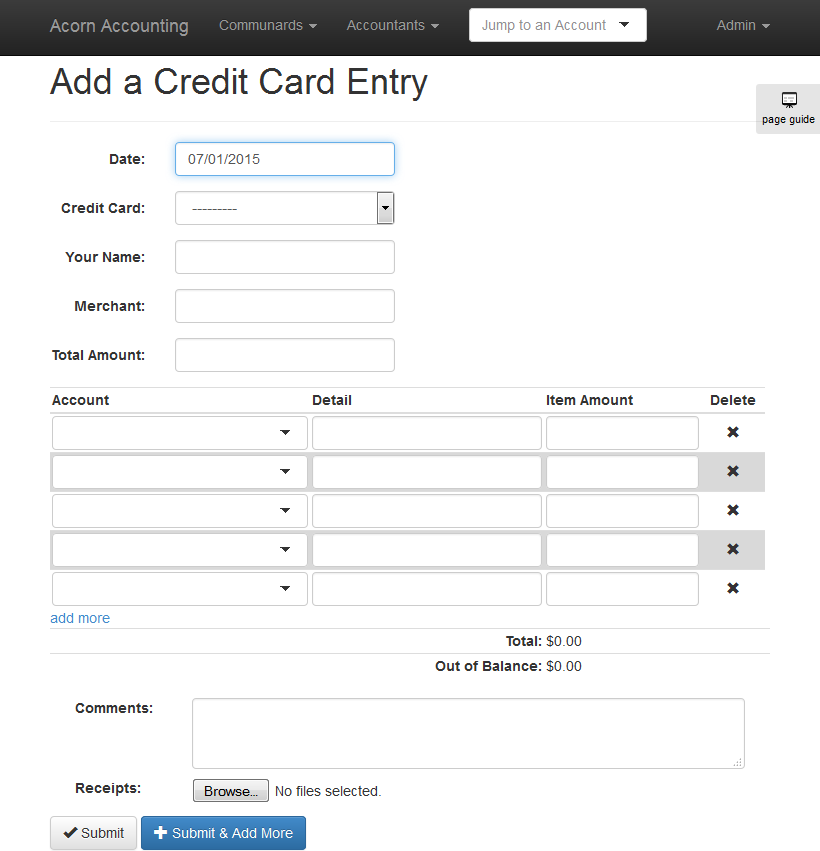
To fill out the form:
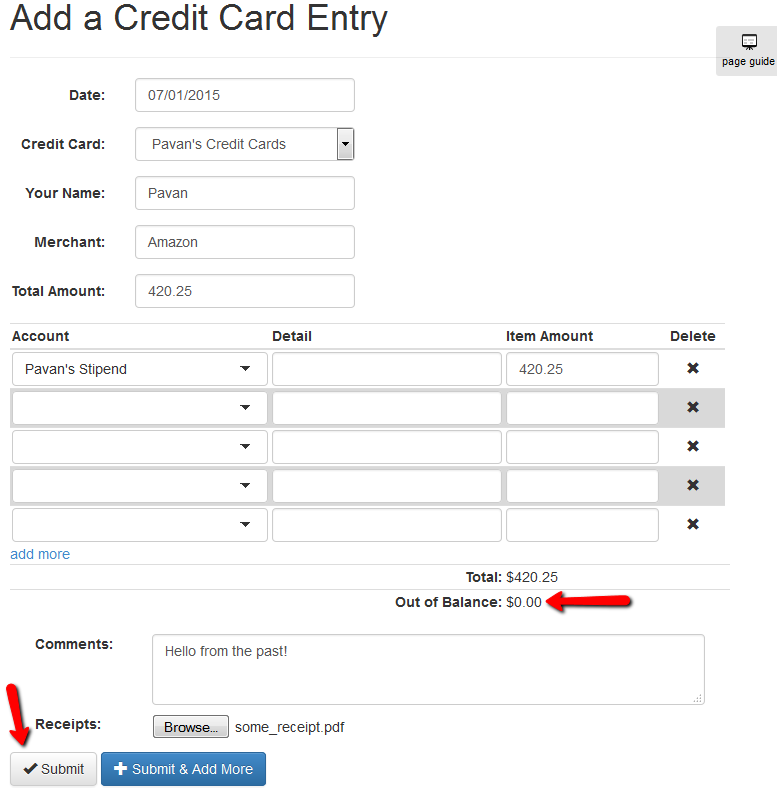
- Fill out the Purchase Date, your Name, the Merchant you made the purchase at, the Total Amount you spent, and select the Credit Card you used from the dropdown menu.
- In the Account/Detail/Amount table, enter the Account to charge your purchase to, a Detail that descriptions the item or service, and the Amount for each item purchased from the merchant.
- If you require additional rows to enter items into, click the add more link at the bottom of the table.
- Use the Total and Out of Balance counters at the bottom of the table to make sure the the Item Amounts sum up to the Total Amount spent. The Out of Balance counter should be zero.
- If there is something abnormal about your purchase, enter any relevent information for the approving Accoutant in the Comments field.
- If you have digital receipts for the purchase, attach them using the Browse... button.
- You can now submit your entry. If you attached a receipt you can use the Submit & Add More button to submit the entry and start filling out another one.
- If you did not attach a receipt, you will be taken to a page showing your entry. You should print this page out, staple any receipts to it, & submit it to your Accountants.
Here is an example of a completed Credit Card Entry:
Submitting Trip Entries
Trip Entriees let Communards enter their Town Trips directly into the Accounting system. All entries are approved by an Accounted before taking effect.
You may also use this form to enter purchases made on store credit, but if all your purchases were made on store credit, you should file an Internal Transfer instead.
After you’ve taken your Town Trip and made some purchases, open up the Accounting Application and in the navigation menu, click the Communards menu and choose Trips from the Create an Entry header:
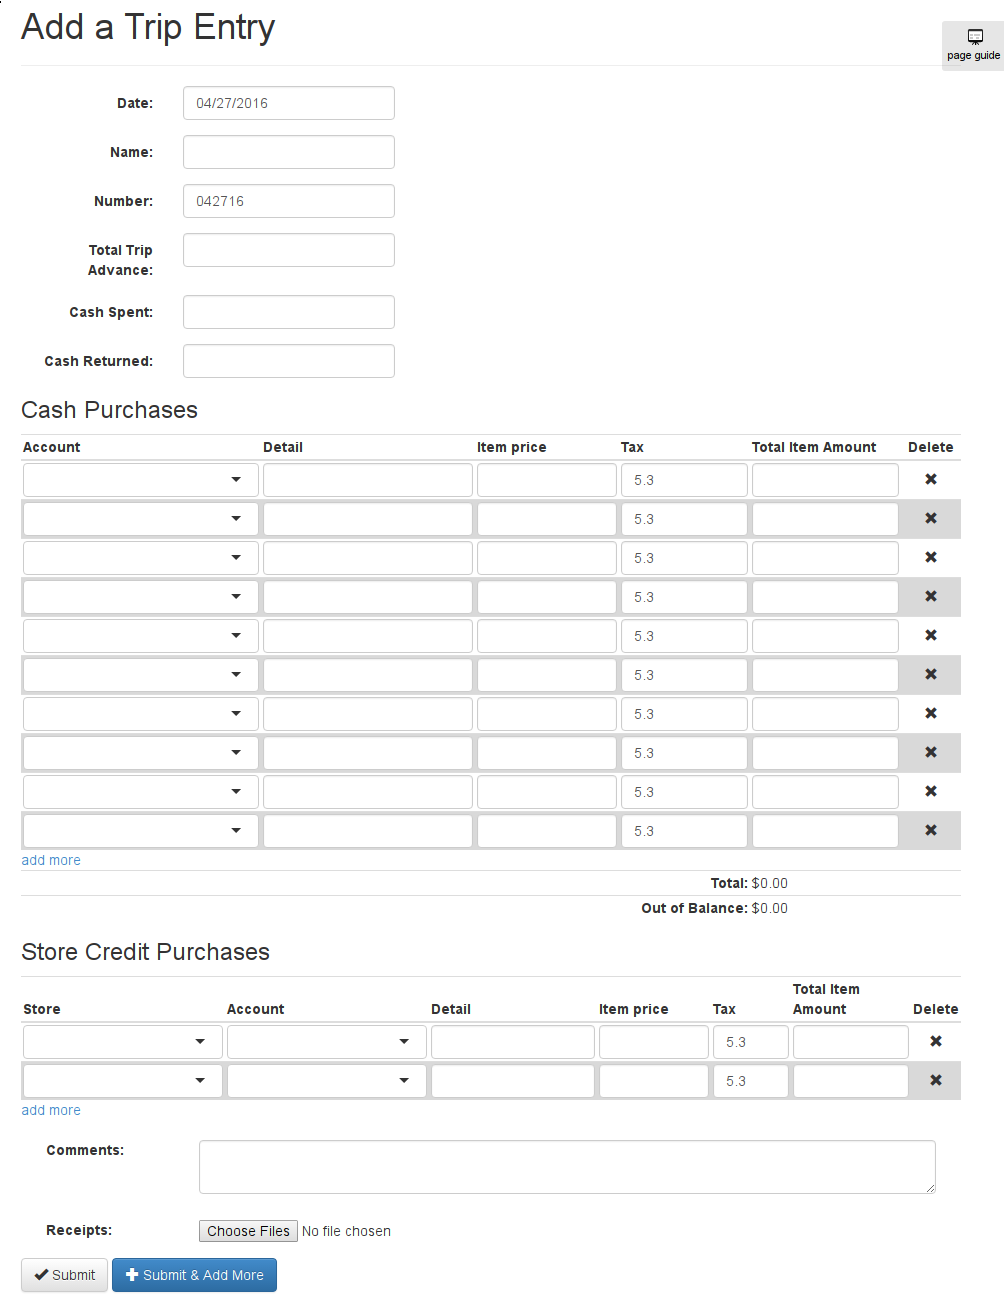
This will bring you to a blank Trip Entry form:
To fill out the form:
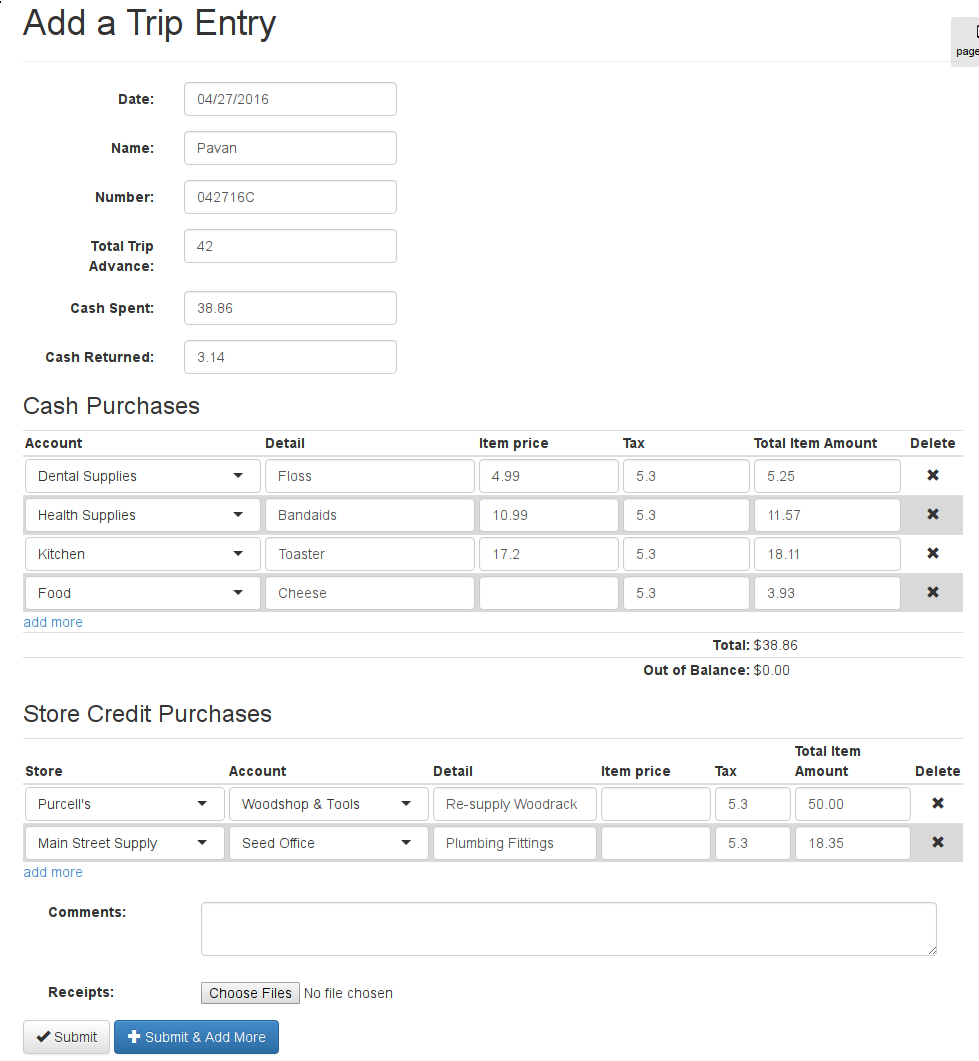
- Enter the Date of trip, your Name, your trip Number (including a trailing letter if it has one).
- In Total Trip Advance, enter how much money you took out for the trip.
- Either the total amount you spent into Cash Spent, or the total amount you had left at the end of the trip into Cash Returned. You only need to fill one of them in, the other field will be automatically calculated using the Total Trip Advance.
- Enter every item you purchased into a row in the Cash Purchases table. For each purchase, select an Account to charge the purchase to, and enter a description of the item or service into the Detail field. You can have the form calculate the total price with tax by entering the Item Price and Tax fields, or you can just enter the total yourself into the Total Item Amount field.
- If you mess up a row, you can hit the Delete button to remove it. If you need to add more rows to the table, click the add more link at the bottom of the table.
- Once you’ve filled the table with all of your cash purchases, you should make sure the Out of Balance counter at the bottom of the table is zero. If it is not, then the Total counter at the bottom of the table does not match your Cash Spent.
- Now enter any purchases you made on store credit in the Store Credit Purchases table. This is like the previous table, but you must also specify the store where you made the purchase.
- If there’s anything unusual about your trip, enter a detail description into the Comments field.
- If you have any electronic receipts for the trip, include them using the Receipts field.
- Once you’r satisfied, click Submit. Only click Submit & Add More if you’ve attached every receipt to the form.
- If your entry is valid, you will be redirected to a page showing the details of your entry. Print this page and staple your receipts to it. Then turn it into Accounting so that your trip may be approved.
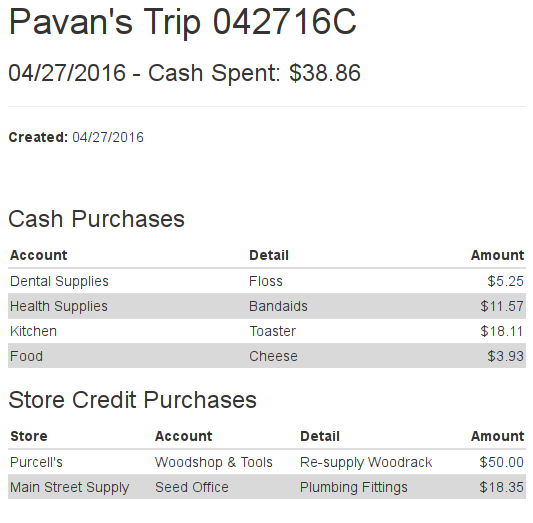
Here is an example of a completed Trip Entry:
And the details page:
Accountants
The following will be created/migrated from the acorn wiki:
- Trip Entries
- Adding Local Stores
- Approving
- Bank Statements
- Adding Banks
- Fiscal Years
Eventually something super in-depth, maybe like:
- Configuration
- Your First 5 Minutes
- Headers
- Accounts
- Events
- Entrys
- Fiscal Years
- Reports
Each section should talk about creating, editing and viewing details. Maybe sections for various pages:
- The Bank Register
- The General Ledger
- The Chart of Accounts
This is kinda low priority, but the basics and peculiarities should be covered before v1.0.
Removing Headers & Footers From Printed Pages
When printing out a page, your browser may add a Header or Footer to the page, containing information such as the date and time, page title, and the URL. If you desire cleaner printing, you can tell your browser to hide this information.
- In Firefox, open the File menu.
- Select the Page Setup item, above Print and Print Preview.
- Select the Margins & Header/Footer tab.
- In the Headers & Footers section, change all the dropdowns to --blank--.
- Hit OK and print the page.

Credit Card Entries
For Communards to be able to submit Credit Card Entries, an Accountant needs to add a Credit Card that they can assign purchases to.
After Credit Card Entries have been submitted, an Accountant needs to review the purchases and approve the entry.
Adding Cards
First we’ll create an Account for the card, then mark the Account to show up in the Credit Card field of Credit Card Entries.
- Open up the Accounting Application and click Add Account from the Admin menu.
- Name the new account(Acorn uses the name and last 4 digits of the credit card - VCB Visa Card - 5555). Set the Parent to Credit Cards Payable.
- Hit Save.
- Go back to the Home Page by clicking the Accounting Administration link at the top of the page.
- Click Add Credit Card from the Admin Menu.
- Choose the Account you just created and a name for it show up as on the Credit Card Entry page. You can leave the name blank to re-use the name of the Account.
- Hit Save.
Approving
It’s easiest to approve entries whenever you receive a new statement. Print it out so that you can cross items off the statement as you approve entries.
- Open the Accountants menu and click Credit Cards from the Approve Entries section.
- You will be brought to a list of all unapproved Credit Card Entries, sorted by Credit Card, then Date. Find the first unapproved entry for the credit card you are approving and click the Approve link in the table row.
- You will now be at the Approve a Credit Card Entry form. You can use this form to edit any of the entry details before approving it.
- At the bottom of the form will be links to any uploaded receipts. You should review the receipt and ensure every item in the form is present on the receipt. If there is no receipt attached, you will see a warning message. You should ensure the communard has turned in a physical copy of the receipt before approving the entry.
- Once every thing looks OK, you can hit Approve to turn the Credit Card Entry into a General Journal Entry, causing it to charge or credit the relevant accounts. You will be taken back to the unapproved entry list. You can hit Approve & Open Next to approve the entry and open the approval form for the next entry for the credit card(by date). If there are no more entries, you will be brought back to the unapproved entry list.
Importing Bank Statements
- Download a statement export from your banks website(see following sections).
- Open the Accountants menu and click Bank Statements from the Import section.
- Select the export you downloaded and select the Bank Account it is for.
- Click Import to upload the export.
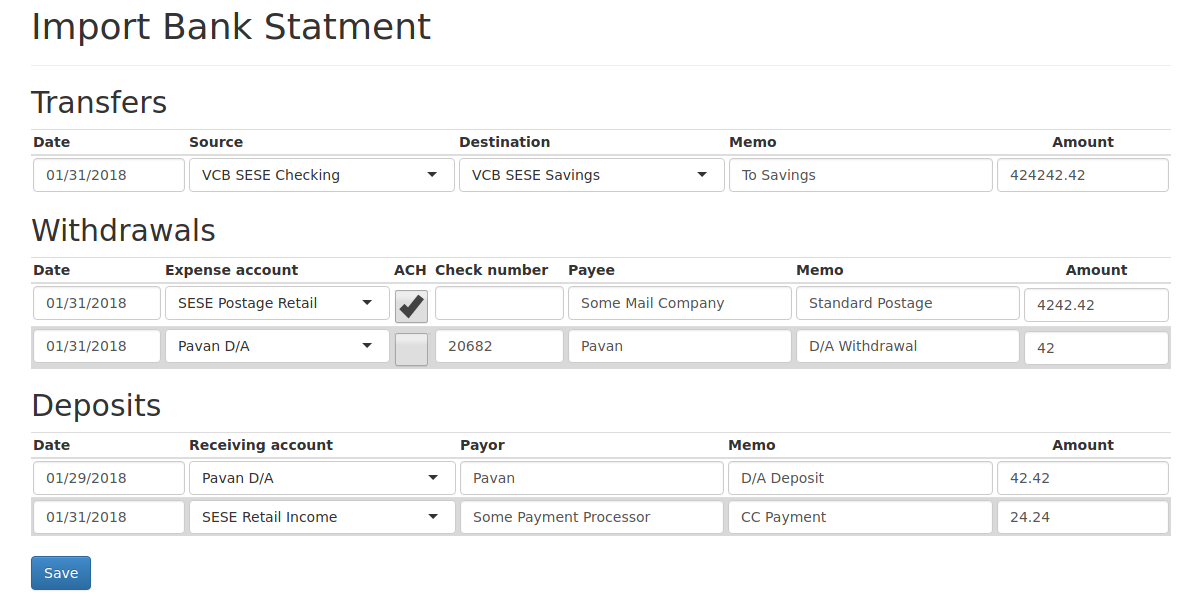
- The application will try to match any existing entries and remove them from the import. You will be shown a form with Transfers, Withdrawals, & Deposits. Some of the fields may be pre-filled based on the memos of existing entries.
- Fill out the form by adding any missing Accounts, Memos, Payors, & Payees.
- Once you are finished, press Save to create the new Entries.
Downloading VCB Exports
- Log in to your VCB Account.
- Click History in the left sidebar.
- Click the Download link in the Selection section of the History page.
- Select the Account you want to export, and the first & last day of the month you want to import.
- Select Comma Separated for the Download Format.
- Click Download and save the file to your computer.