Screen Descriptions
AcornAccounting is web-based and each distinct web page is considered a screen. Each screen is generated by the Django back-end framework and will use the Twitter Bootstrap front-end framework.
The following wireframes may not be rendered/styled with the front-end elements and are meant to convey the layout of the application, not it’s final appearance or style.
The Wireframes are built using Pencil and the Pencil Document is available for download.
Global Design
The following design features will be implemented consistently throughout the application:
- All Date fields will require the input to be in some combination of MM/DD/YYYY or M/D/YY format, such as 01/2/13 or 3/20/12. Clicking a Date field will pop-up a calendar, allowing the User to select a date, instead of having to enter one.
- Table rows will change their font/background colors to a unique set when moused over.
- Negative balances and amounts will be surrounded by parenthesis, ($22.00), instead of having minus signs, -$22.00.
General Layout
The general layout of the website will follow the basic Header-Content-Footer model:
- Header - Company Logo/Title, Navigation
- Content - Each screens unique content
- Footer - Copyright, Additional Links(feedback, bug report, documentation)
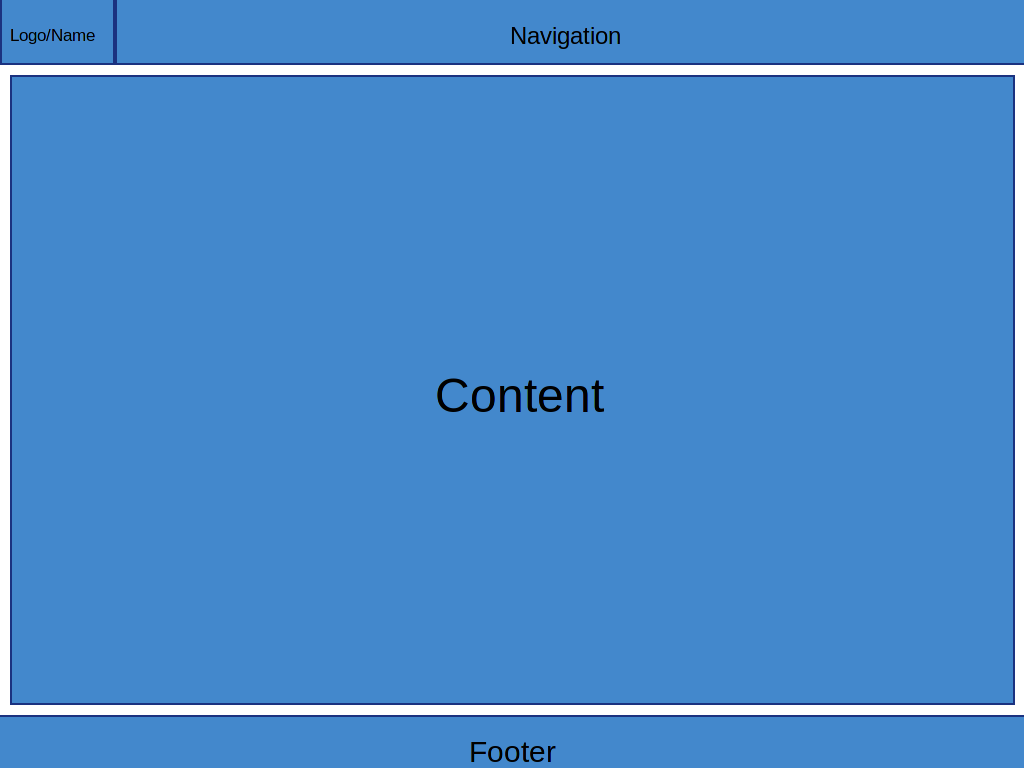
The general layout of the application.
There will be no global sidebars.
Navigation
The Navigation will be placed in the Header section of the General Layout.
The navigation will contain multiple dropdown-menus and autocomplete inputs:
- A Logo and/or Company Name(hyperlinked to the Home Page)
- An Accounts Sub-menu
- An Entry Sub-menu
- A Reports Sub-menu
- An Accounts Autocomplete Input
- A Bank Journals Autocomplete Input
- A Admin Sub-menu

The Base Navigation Menu.
Accounts Sub-Menu
The Accounts Sub-Menu will contain the following Items and Links:
- Chart of Accounts
- General Ledger
- Budgeted Accounts
- Member Stipends - Linking to the Member's Stipends Chart of Accounts Page
- Member Deposited Assets - Linking to the Member's Deposited Assets Chart of Accounts Page
- Account History Page
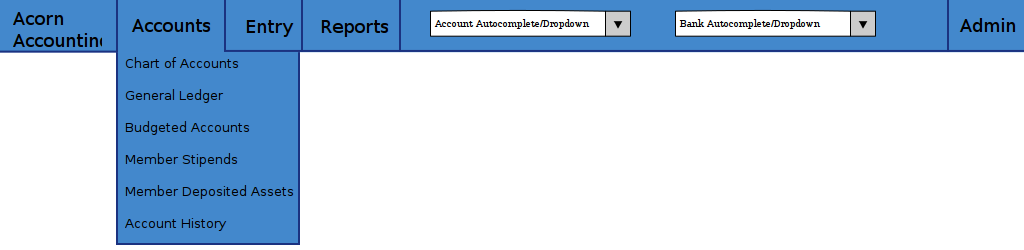
The Accounts Sub-Menu.

Reports Sub-Menu
The Reports Sub-Menu will contain the following Items and Links:

The Reports Sub-Menu.

Autocomplete Inputs
An Autocomplete Input Widget allows users to enter filtering text and select items from a dropdown box. The Inputs will be pre-populated will all respective items. When the user enters text, a dropdown will appear with suggested completions that the user can select. The user can also click the Input Widget, causing it to display a selectable list of all items.
Upon item selection, the application will redirect the user to a specific page:
- The item’s Account Detail Page for the Accounts Autocomplete Input
- The item’s Bank Journal Page for the Bank Journal Autocomplete Input
For a working example of this functionality, see the Select2 Widget.

An example of the Autocomplete Input Widgets.
Home Page
The Home Page will be the Chart of Accounts Page.
In the future, the content may change to show recent activity and priority items(see Alternate Home Page).
Entry Conditions
The Home Page will be accessible through the application’s base URL(e.g. www.acornaccounting.com/). The Navigation’s Company Title and Logo will be a hyperlink, directing the User to the Home Page.
Admin Pages
The Application will initially use the default Django admin app for generating administration pages. The admin app will be used for Creating and Editing Headers, Accounts and Events. Eventually custom administration pages will be made for Creating each item, while Edit links will be placed in the Account Detail Page and Event Detail Page.
Entry Conditions
The admin back-end will be accessible by clicking on the Admin Sub-Menu, specific pages will be accessible by clicking on the respective items in the Sub-Menu.
Initial Conditions
If the User is logged in, a table will be displayed, showing links to the Accounts, Headers and Events sub-pages.
Otherwise, a login form containing fields for a Username and Password will be displayed.
Final Conditions
If the User is not logged in, submitting the form will validate the User’s Login Credentials, redirecting to the main Admin Page if valid.
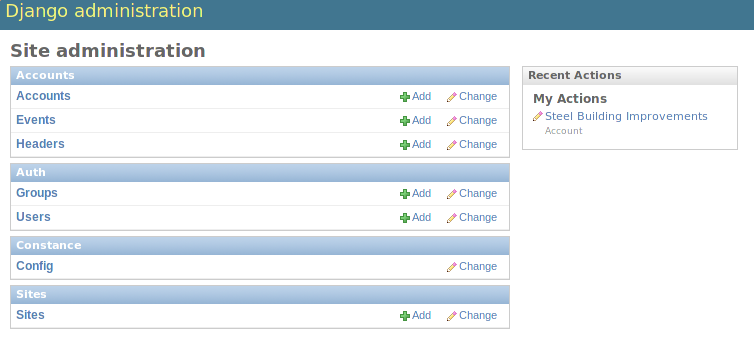
The Main Administration Page, created by Django’s Admin App.
Headers Admin
Accounts Admin
Events Admin
Chart of Accounts Page
The Chart of Accounts Page displays all Headers and Accounts of the Company, and their respective Balances.
Case 1 describes accessing the global Chart of Accounts. Case 2 describes accessing the Chart of Accounts recursively, by clicking on a Header row in the Chart of Accounts.
Entry Conditions
Case 1
This screen is accessible through the Chart of Accounts link in the Accounts Sub-Menu.
It is currently the Home Page and therefore clicking the Company Name/Logo to the left of the Navigation will redirect the user to this screen.
Case 2
The screen is also recursively accessible, clicking on a Header row in this screen will send the User to a Chart of Accounts Page for that specific Header.
Initial Conditions
Case 1
The page will display a series of tabs above a single table. The Tabs will be named by the different Account Types(Assets, Liability, Equity, etc.) and the currently selected tab will be differentiated by color. By default the table will contain all Headers and Accounts that are Assets and the Asset Tab will be selected.
The Table will have headings for Account Numbers, Names, Descriptions and Current Balances. The Headers’ font and background colors will be different from Accounts’. Child Headers and Accounts will have their names indented one level higher than their Parent Header, like in the following example:
I am the Highest Header
    I am its child Account
    I am a sub-Header
        I am the sub-Header's child Account
Mousing over a row should highlight that row in a unique color, and removing the mouse from a row should revert the effect.
Case 2
If the screen is accessed recursively by a Header row hyperlink, the screen will emulate Case 1 except the tabs will be replaced with breadcrumb links up the Header’s ancestor tree. Instead of showing all Headers and Accounts, only the children of the selected Header will be displayed.
Intermediate Conditions
Case 1
Clicking an Account Type Tab will replace the table, Headers, and Accounts currently displayed with a table containing all Headers and Accounts of the newly selected Account Type.
Final Conditions
Each row of the table will be a hyperlink. Header rows will link back to the Chart of Accounts Page, using the selected Header for Case 2. Account rows will link to the Account’s Account Detail Page.
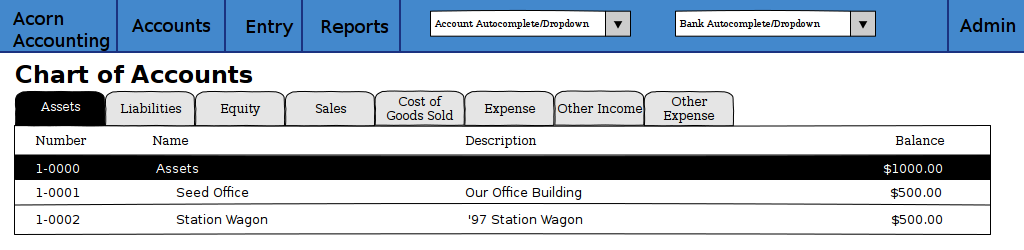
A Sample Chart of Accounts Page(Case 1).
Account Detail Page
The Account Detail Page will be used to display Transactions associated with a specific Account within a User-specified date range.
Entry Conditions
This screen is accessible by clicking on an Account row on the Chart of Accounts or the General Ledger, and by selecting an Account from the Account Autocomplete Input.
Initial Conditions
The page will contain a Date Range form, a Heading and information, several buttons for administration and a table for displaying the Account’s Transactions.
The Date Range form will have 2 Text Input Widgets, labeled Start Date: and End Date:. They will be used to control the date range of Transactions shown. The Start Date will default to the first day of the current month while the End Date will default to the current date.
The Heading will display the Account’s Number, Name and Current Balance. Additional information should include the statement date of the last reconciliation, only if the Account was previously reconciled.
There will be 2 buttons for Accountants/Administrators, Edit for changing the Account’s details(name, parent, balance, etc.) and Reconcile for reconciling the Account against Bank Statements. If the Account is a Bank Account, there should also be a button linking to it’s Bank Journal.
The table will be populated with Transactions within the date range. The table will have headings for the Entry Number, Date, Memo, Transaction Detail, Debit/Credit, Event and Account Balance. The Account Balance will only be shown if the date range is within the current Fiscal Year.
The table will contain a footer that displays the total amounts of Debits and Credits and the Net Change(Credits - Debits) for the date range. If the date range is within the current Fiscal Year, a Start Balance and End Balance will also be shown.
Final Conditions
The Edit Hyperlink will direct the User to the Account’s Edit Page. The Reconcile Hyperlink will direct the User to the Account’s Reconcile Page.
Clicking on a row in the table will direct the user to the Entry Detail Page for the specific Transaction. If an item in the Event column is clicked, the User will be directed to the Event Detail Page for the Event.
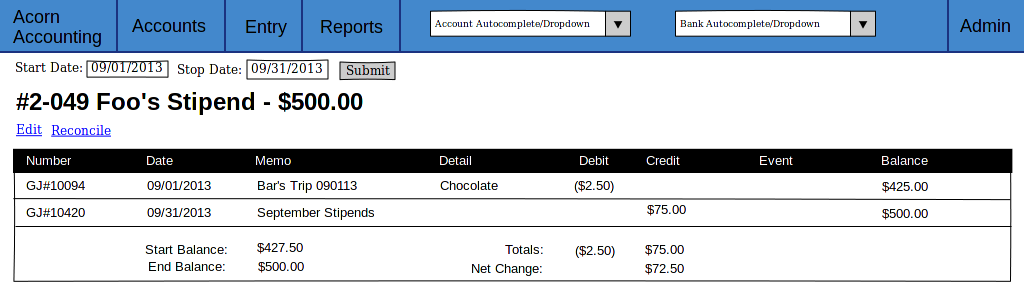
A Sample Account Detail Page.
Event Detail Page
The Event Detail Page will be used to display all Transactions associated with a specific event.
Entry Conditions
The Event Detail page may be reached from the Events Report Page by clicking a row in the table or from the General Ledger Page, Bank Journal Page or the Account Detail Page by clicking on an Event in the Page’s table’s Event column.
Initial Conditions
The page will contain a Title Heading, Sub-Heading and Table.
The Title Heading will be composed of the Event Name and Number, the Sub-Heading will contain the City, State and Date of the Event.
The table will be populated with Transactions that are associated with the Event. It should have headings for the Transaction’s Entry Number, Date, Account, Memo, the Transaction’s Detail, and Credit/Debit Amount.
The table will contain a footer that displays the total amounts of Debits and Credits and the Net Change for the Event.
Final Conditions
Clicking a row in the table should direct the User to the Entry Detail Page for the selected Transaction/Entry. However, if a row is clicked in the Account column the User will be directed to the Account Detail Page for the selected Transaction.
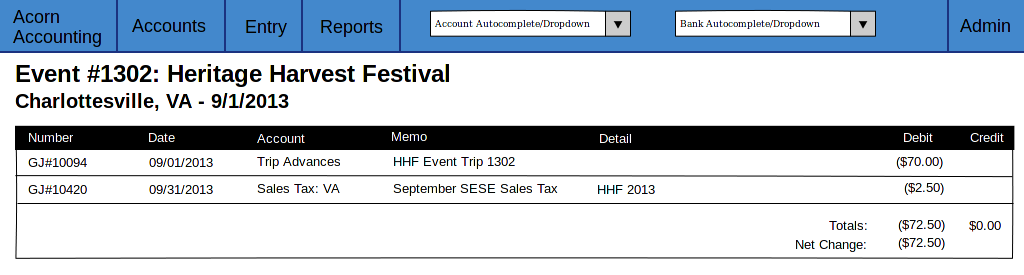
A Sample Event Detail Page.
Account History Page
The Account History page is used to show purged data from previous Fiscal Years. The page will show either the Account Balance or Net Change for each month in previous Fiscal Years, depending on the type of the Account.
Note
Historical Accounts are only generated after creating a second Fiscal Year. If Fiscal Years are not used or only one Fiscal Year has been created, there will be no Account History pages.
Entry Conditions
This screen is accessible via the Account History link in the Accounts Sub-Menu. The default month displayed is the current month in the previous year. Other months may be accessed by Next and Previous buttons on this screen.
Initial Conditions
The screen contains a Title Heading, buttons for month navigation and tabs above a table.
The Title Heading will contain Account History and the month/year being displayed, in MM/YYYY format.
There will be Previous and Next buttons, allowing the User to view the Account History for a different month.
There will be 2 tabs, one labeled Balances and one labeled Profit & Loss. The currently selected tab should be differentiated by color. By default, the Balances tab will be selected. The Balances tab will contain Accounts that are Assets, Liabilities and Equities. The amount column for these Accounts will represent the month-end balances. The Profit & Loss tab will contain all other Account Types(Expenses and Incomes), their amount column represents the Net Change in value for the month.
The table will display the Historical Accounts for the selected month and year. The table will have headings for Account Numbers, Names and Amounts.
Intermediate Conditions
Clicking on a tab will toggle which Historical Accounts are shown in the table.
Final Conditions
Clicking on the Next or Previous buttons will direct the User to the next or previous month’s Account History.
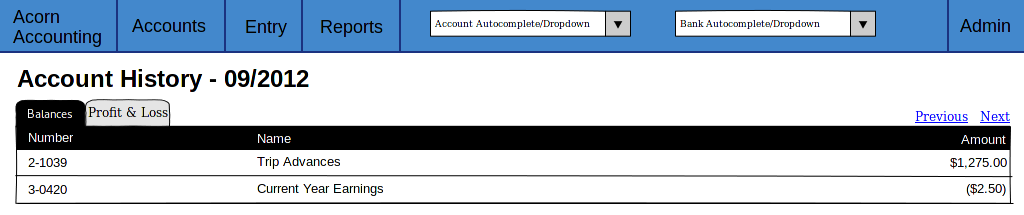
A Sample Account History Page showing the Balances of the 2 Asset/Liability/Equity Accounts that existed in the 2012 Fiscal Year. Clicking the Profit & Loss tab would display the Net Changes of all other Account types.
Journal Entry Detail Pages
The Journal Entry Detail pages will be responsible for display information about a specific Journal Entry and it’s associated Transactions.
There are three types of Journal Entries:
- Bank Receiving Entry - Entries that put money into a Bank Account (checks, ACH payments, cash deposits, etc.)
- Bank Spending Entry - Entries that take money out of a Bank Account (checks, cash withdrawals, etc.)
- General Journal Entry - Entries not related to Bank Accounts (internal transfers, cash drawer withdrawals, etc.)
General Journal Entry
Entry Conditions
The General Entry page will be accessible by clicking an Entry on the General Ledger Page, or by clicking a Transaction on the Account Detail Page or Event Detail Page.
After submitting valid data on the Add Journal Entry Page, the User will be redirected to this page if they do not choose to add more Entries.
Initial Conditions
The page will contain Headings, administrative information/buttons, and a table for displaying the Journal Entry’s Transactions.
The Heading will display the Entry’s date, memo and number.
A Created and Updated (if applicable) Date should be shown, along with a link for Accountants to Edit the Entry.
The Table will be populated with the Entry’s Transactions. It will have headings for the Transaction’s Account, Detail, Debit/Credit Amount and Event. The table will have a footer showing the total amount of Credits and Debits.
Final Conditions
The Edit Hyperlink will direct the User to the Add Journal Entry Page for the Entry(Case 2).
Clicking a row in the Transaction table will direct the User to the Account Detail Page for the Transaction’s Account.
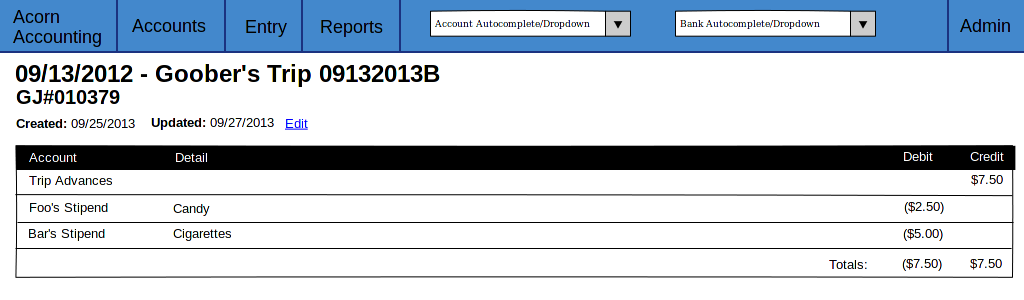
Sample Journal Entry Detail Page.
Bank Receiving Entry
Entry Conditions
The Bank Receiving Entry page will be accessible by clicking an Entry on the Bank Journal Page or by clicking a Transaction on the Account Detail Page or Event Detail Page.
The User is redirected to this Page after submitting valid data on the Add Bank Receiving Entry Page.
Initial Conditions
The page will contain Headings, administrative information/buttons, and a table for displaying the Bank Receiving Entry’s Transactions.
The Headings will display the Entry’s date, bank account, memo, entry number, payor and debit amount.
A Created and Updated (if applicable) Date should be shown, along with a link for Accountants to Edit the Entry.
The Table will be populated with the Bank Receiving Entry’s Transactions. It will have headings for the Transaction’s Account, Detail, Credit Amount and Event.
Final Conditions
The Edit Hyperlink will direct the User to the Add Bank Receiving Entry Page for the Entry(Case 2).
Clicking a row in the Transaction table will direct the User to the Account Detail Page for the Transaction’s Account.
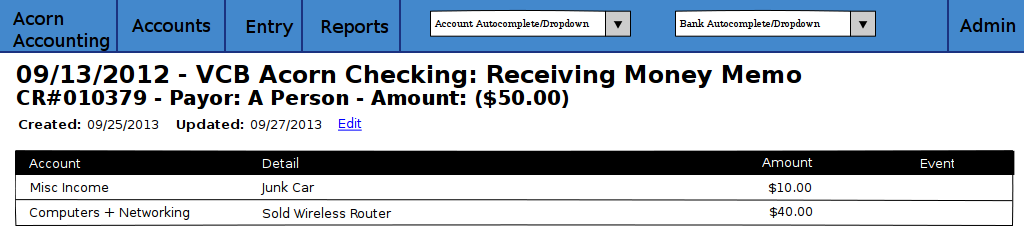
Sample Bank Receiving Entry Detail Page.
Bank Spending Entry
Entry Conditions
The Bank Spending Entry page will be accessible by clicking an Entry on the Bank Journal Page or by clicking a Transaction on the Account Detail Page or Event Detail Page.
Initial Conditions
The page will contain Headings, administrative information/buttons, and a table for displaying the Bank Spending Entry’s Transactions.
The Headings will display the Entry’s Date, Bank Account, Memo, Number, Payee and Credit Amount.
Note
The Entry Number will be CD# <check_number> for entries with Check Numbers and CD###ACH### for entries that are ACH Payments.
A Created and Updated (if applicable) Date should be shown, along with a link for Accountants to Edit the Entry.
The Table will be populated with the Bank Receiving Entry’s Transactions. It will have headings for the Transaction’s Account, Detail, Debit Amount and Event.
Final Conditions
The Edit Hyperlink will direct the User to the Add Bank Spending Entry Page for the Entry(Case 2).
Clicking a row in the Transaction table will direct the User to the Account Detail Page for the Transaction’s Account.
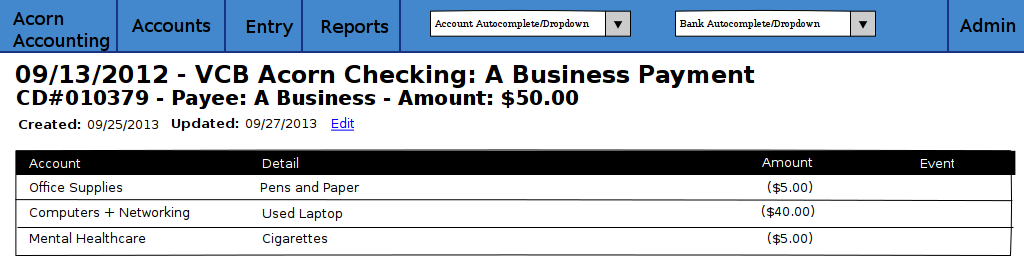
Sample Bank Spending Entry Detail Page for an Entry with a Check Number.
General Ledger Page
The General Ledger page will be used to display all General Journal Entries and their associated Transactions within a user-specified date range.
Entry Conditions
This screen is only accessible through the General Ledger item in the Navigation’s Accounts Sub-Menu.
Initial Conditions
The page will contain a Date Range form, a Heading, and a table for displaying General Journal Entries within the Date Range.
The Date Range form will have 2 Text Input Widgets, labeled Start Date: and End Date:. They will be used to control the date range of Journal Entries shown. The Start Date will default to the first day of the current month while the End Date will default to the current date.
The Heading will display General Ledger and the current date range.
The table will be populated with General Journal Entries within the date range. The table will display each Journal Entry’s Number, Date and Memo, along with the Accounts, Details, Credits/Debits and Events of the Journal Entry’s Transactions.
Final Conditions
Submitting a valid Start and End date will cause the page to reload, filling the table with General Journal Entries from the submitted date range.
Clicking on a Journal Entry row in the table will direct the user to the Detail Page for the selected Journal Entry. Clicking on an Account row in the table will direct the user to the Account Detail Page for the selected Account. Clicking on an Event in the table will direct the user to that Event’s Detail Page.
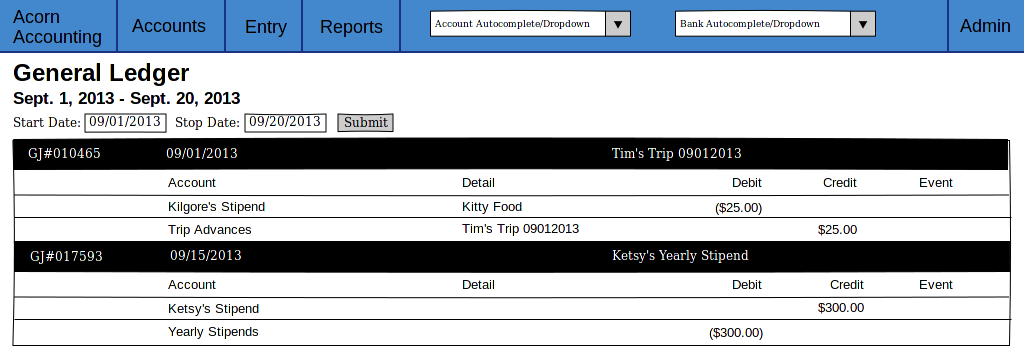
A Sample General Ledger Page, showing two General Journal Entries.
Bank Journal Page
The Bank Journal page will be used to display a Bank Account’s Bank Spending and Bank Receiving Entries within a user-specified date range.
Note
Accounts are designated as Bank Accounts in the Account Admin Page.
Entry Conditions
The Bank Journal page will be accessed through the Bank Journal Autocomplete Input in the Navigation Menu. Submitting a valid Bank Account will direct the user to the Bank Journal page for that Account.
Initial Conditions
The page will contain a Date Range form, a Heading, and a table for displaying Bank Spending and Receiving Entries within the Date Range.
The Date Range form will have 2 Text Input Widgets, labeled Start Date: and End Date:. They will be used to control the date range of Bank Entries shown. The Start Date will default to the first day of the current month while the End Date will default to the current date.
The Heading will display the Account’s Name, Journal and the current date range.
The table will be populated with Bank Spending and Receiving Entries within the date range. The table will display each Bank Entry’s Number, Date and Memo, along with the Accounts, Details, Credits/Debits and Events of the Bank Entry’s Transactions.
Final Conditions
Submitting a valid Start and End date will cause the page to reload, filling the table with Bank Entries associated with the Bank Account within the submitted date range.
Clicking on a Bank Spending Entry row will direct the user to its Spending Detail Page, a Bank Receiving Entry to its Receiving Detail Page. Clicking on an Account row in the table will direct the user to the Account Detail Page for the selected Account. Clicking on an Event in the table will direct the user to that Event’s Detail Page.
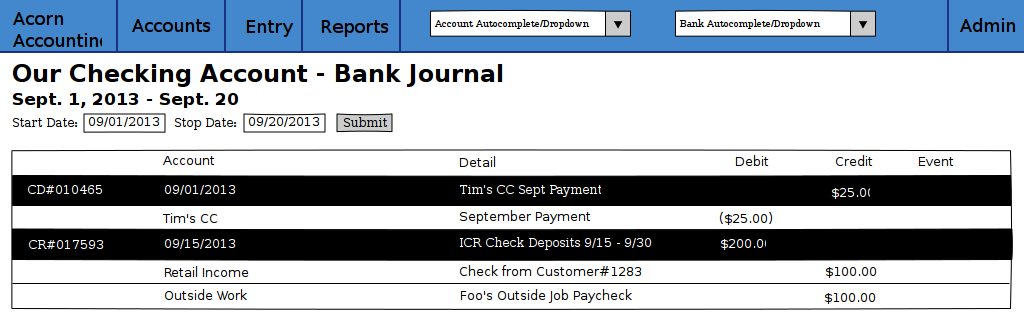
A Sample Bank Journal Page, showing both Bank Spending and Bank Receiving Entries.
Events Report Page
The Events Report Page shows an overview of all Events.
Entry Conditions
The page is accessible through the Events link in the Reports Sub-Menu.
Initial Conditions
The page will contain a Heading and a table for displaying all Events.
The Heading should be Events Report.
The table should have headers for each Event’s date, name, number, city, state and net change. The net change should be the sum of all credits and debits related to the Event.
Final Conditions
Clicking a row in the Events table will redirect the user to that Event’s Detail Page.
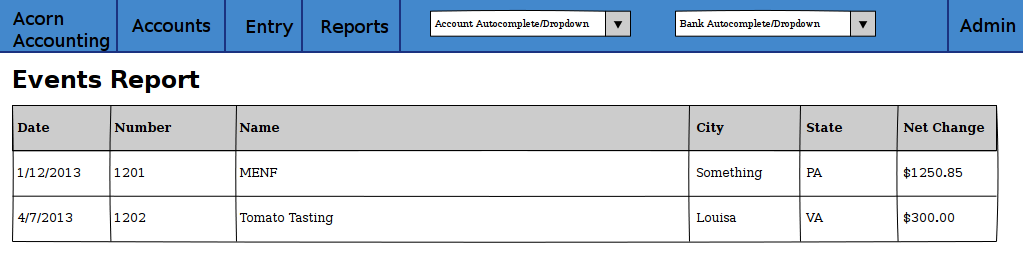
A Sample Events Report Page, showing two Events.
Profit & Loss Report Page
The Profit & Loss Report shows the Net Profit or Loss over a specified date range.
Entry Conditions
The page is accessible through the Events link in the Reports Sub-Menu.
Initial Conditions
The page will contain a Heading, a Date Range form and a table containing header totals and summations.
The Heading should be Profit & Loss Statement along with the selected Date Range.
The Date Range form will contain two fields, the Start Date and Stop Date. The default dates should be the first day of the current to the current day.
The table will have no column headings. The table will display header totals and the results of calculations using these totals. There will be a table body for the following headers and calculations:
- Sales
- Cost of Goods Sold
- Gross Profit (Sales - CoGS)
- Expenses
- Operating Profit (Gross Profit - Expenses)
- Other Income
- Other Expenses
- Net Profit/(Loss) (Operating Profit + Other Income - Other Expenses)
The table should have 5 columns:
- Header/Account/Calculation Name
- Account Credits
- Account Debits
- Child Header Totals
- Root Header/Cacluation Total
Names should be indented by their depth level. Only root Headers, their children and grandchildren should have their totals shown. The total for a root Header is shown at the end of the table, after all the child Headers. The general layout will look like:
Root Header
  Child Account                         $7.00
  Child Header
    Some Account            ($12.00)
    Grandchild Header                              2.00
      Another Account                   $2.00
  Child Header Total                            ($10.00)
Root Header Total                                           ($3.00)

Some Counter                                                ($3.00)
Final Conditions
Submitting a valid Date Range form will reload the page using the new start and stop dates for the table calculations.
Clicking a row in the table will redirect the user to that Account’s Detail Page.
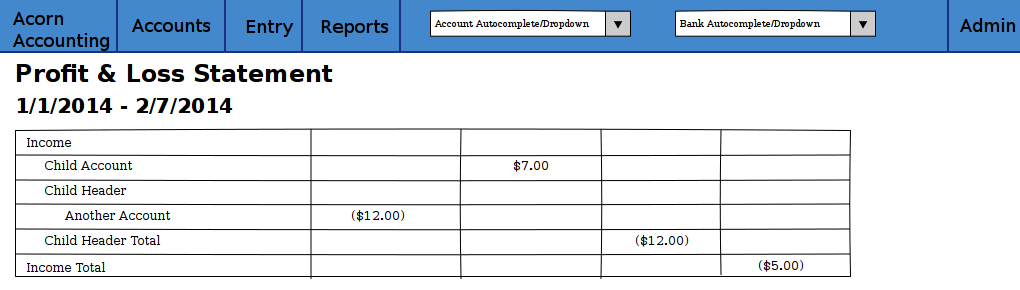
A Sample Profit & Loss Report Page, showing just the Income Header.
Trial Balance Report Page
The Trial Balance Report shows the net change and balances of all Accounts over a specified date range.
Entry Conditions
The page is accessible through the Trial Balance link in the Reports Sub-Menu.
Initial Conditions
The page will contain a Heading, a Date Range form and a table of every Account.
The heading should be Trial Balance Report along with the start and stop dates of the period currently being displayed.
The Date Range form will contain two fields, the Start Date and Stop Date. The default dates should be the first day of the current to the current day.
The table should have headings for each Account’s number, name, balance at the beginning of the period, total debits, total credits, net change and the ending balance.
Final Conditions
Submitting a valid Date Range form will reload the page using the new start and stop dates for the table calculations.
Clicking a row in the table will redirect the user to that Account’s Detail Page.
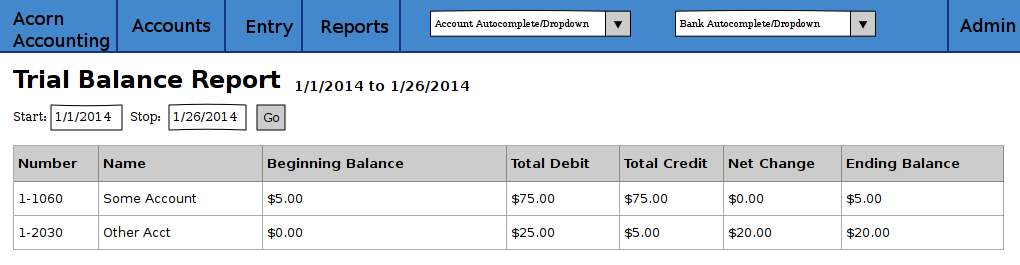
A Sample Trial Balance Report Page.
Reconcile Account Page
The Reconcile Account page will be used to reconcile an Account’s Balance and Transactions against a statement.
Case 1 describes the initial Reconcile screen. Case 2 describes this screen after a Statement Balance and Date are entered.
Entry Conditions
Case 1
The Reconcile Account screen is accessible through the Reconcile link on the Account Detail Page.
Case 2
Submitting a valid Statement Balance and Statement Date on the Account Reconcile Case 1 screen will direct the User to the Case 2 screen.
Initial Conditions
Case 1
The screen will contain a Heading and a form to retrieve Transactions.
The heading will be Reconcile followed by the Account’s Name.
The form will have inputs for the Statement Date and Statement Balance. If the Account has previously been reconciled, the previous Statement Date and Statement Balance will also be shown(labeled as the Last Reconciled Date and Reconciled Balance).
The Statement Date will default to the current date. The Statement Balance will default to the Reconciled Balance.
The form will be submit by a button labeled Get Transactions.
Case 2
This screen will contain all elements of Case 1 with an additional table, displaying all unreconciled Transactions associated with the Account that are dated before the submitted Statement Date.
The table will contain checkboxes to toggle whether a Transaction is to be reconciled and each Transaction’s information. The table headers will be a checkbox(to toggle all Transactions on or off) and the Transaction’s Date, Entry Number, Entry Memo, Debit/Credit Amount, Event.
The Table will have footer that displays the Debit/Credit totals, net change and out of balance amount for all selected Transactions. The out of balance amount is determined by adding the last reconciled balance to the statement balance and subtracting by the net change. It represents the Transaction Credit/Debit total required to make the Reconciled Balance equal to the Statement Balance.
The Get Transactions button will resubmit only the Statement Date and Balance, retrieving Transactions from before the new Statement Date.
A Reconcile Transactions button will also be present, underneath the Transaction table. This button will be used for final form submission.
Intermediate Conditions
Case 1
The Statement Balance will be required to be a valid number.
Case 2
Toggling the checkbox in the table header will cause all listed Transactions to be selected or unselected. Selecting a Transaction’s checkbox will update the Debit/Credit totals, the Net Change and Out of Balance Amounts.
The form will only be considered valid if the out of balance amount is equal to $0.00, i.e. if reconciled balance + net change = statement balance.
Final Conditions
Case 1
Submitting a valid form by using the Get Transactions page will return the Screen for Case 2.
Case 2
The Get Transactions button will refresh the Screen retrieving different Transactions if the Statement Date was changed.
Submitting a valid form using the Reconcile Transactions button will change the Account’s reconciled balance to the Statement Balance and mark each selected Transaction as reconciled. The User will be redirected to the Account’s Detail Page.
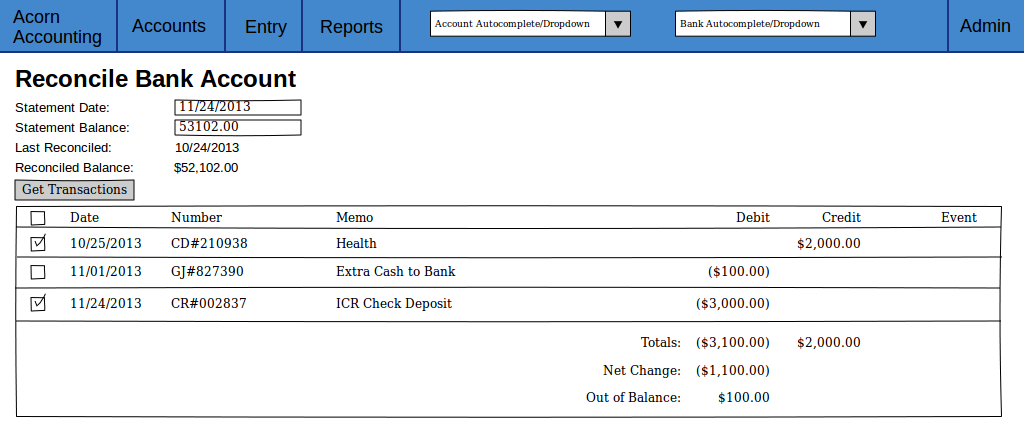
A Sample Account Reconciling Page, showing Transactions marked for reconciliation(Case 2).
Journal Entry Creation Pages
The Journal Entry Creation Pages will be responsible for creating/editing and validating new Entries and Transactions.
Add Journal Entry
The Add Journal Entry Page will be used to create new General Journal Entries(Case 1) and edit existing Entries(Case 2).
Entry Conditions
Case 1
This Page is accessible through the General Journal link in the Entry Sub-Menu.
Case 2
Clicking the Edit link in a General Journal Entry’s Detail Page will direct the User to this Page.
Initial Conditions
The page will contain a Heading and a form to enter Entry details.
The form should contain 2 sections, one for the overall entry details and a table containing each Transaction’s details.
The Entry details part of the form will include inputs for the Entry Date, Memo and Additional Comments.
The Transaction table will have headers for each Transaction’s Account, Details, Debit/Credit Amount, Event and for deleting the row. There will be a link to add additional rows to the table. The table’s footer will show the Debit and Credit totals and the amount the entry is Out of Balance(the Credit total minus the Debit total).
The form will contain two buttons, Submit and Submit & Add More.
Case 2
All inputs will contain the details of the Journal Entry being edited.
A Delete button will be on the Page in addition to the 2 Submit buttons.
Intermediate Conditions
The Date and Memo fields, and at least two Transactions, are required.
Only a Debit or Credit may be entered in each row, a Transaction cannot have both.
Changing a Debit or Credit amount will update the Credit/Debit Totals and Out of Balance amounts.
Checking a row’s Delete box will remove that row from the table and update the Totals and Out of Balance amounts.
A valid form will have a Debit Total equal to it’s Credit Total, resulting in an Out of Balance amount of zero.
Final Conditions
A valid form will create the Journal Entry and the entered Transactions, redirecting the User to the Entry’s Detail Page.
If the form was submit using the Submit & Add More button, the Screen will refresh with a blank form.
Case 2
Submitting the form using the Delete button will delete the Entry and its Transactions, redirecting the User to the General Ledger.
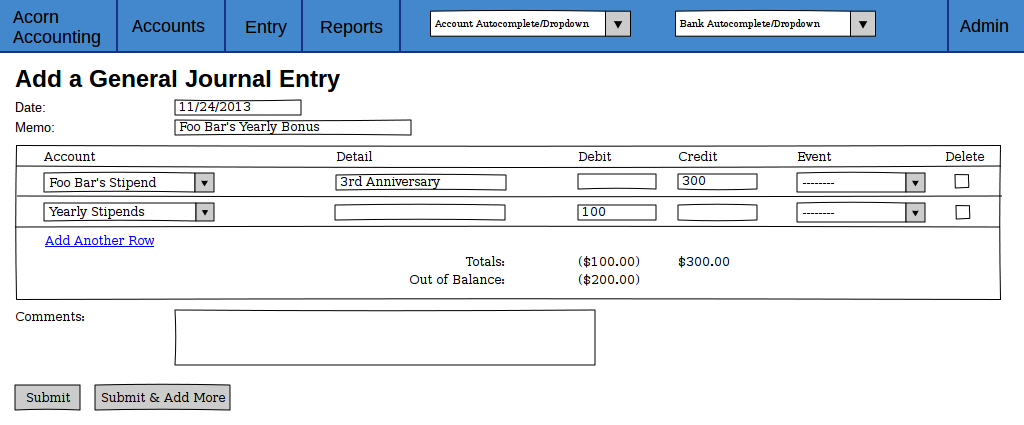
A Sample Add Journal Entry Page, showing an Out of Balance entry.
Add Transfer Entry
This Page will be used create Entry’s that transfer discrete amounts between two Accounts.
Entry Conditions
This Page is accessible through the Transfer link in the Entry Sub-Menu.
Initial Conditions
This Page mimics the Add Journal Entry Page, except the table contains Source, Destination and Amount columns instead of the Account, Credit and Debit Columns. The table will not contain Total or Out of Balance amounts.
Intermediate Conditions
A source, destination and amount for at least one Transaction is required.
Checking a row’s Delete box will remove that row from the table.
Final Conditions
A valid form will create a General Entry and two Transactions for each row in the table, one will debit the Source Account and the other will credit the Destination Account. The User will be redirected to the Entry’s Detail Page.
If the form was submit using the Submit & Add More button, the Screen will refresh with a blank form.
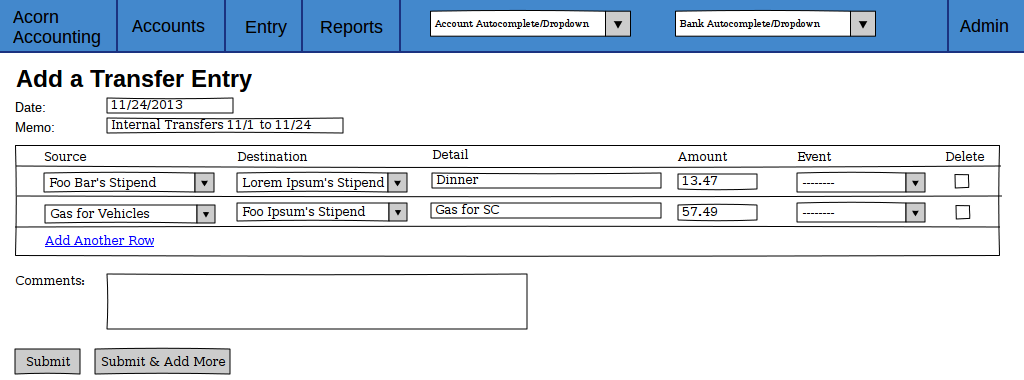
A Sample Add Transfer Entry Page, showing 2 rows which will create 4 Transactions.
Add Bank Receiving Entry
This Page is used to enter and update deposits to Bank Accounts.
Entry Conditions
Case 1
This Page is accessible through the Bank Receiving link in the Entry Sub-Menu.
Case 2
Clicking the Edit link in a Bank Receiving Entry’s Detail Page will direct the User to this Page.
Initial Conditions
This Page mimics the Add Journal Entry Page, except for some differences in fields.
The entry fields will also include an Account, Payor and Amount. The Accounts field will be limited to Accounts that are Bank Accounts. The Transaction table will contain a single Amount field instead of Credit and Debit fields.
Case 2
All inputs will contain the details of the Receiving Entry being edited.
A Delete button will be on the Page in addition to the 2 Submit buttons.
Intermediate Conditions
A Bank Account, Date, Amount, Memo and at least one Transaction is required.
Checking a row’s Delete box will remove that row from the table.
Final Conditions
A valid form will create or update the Bank Receiving Entry and the entered Transactions. The User will be redirected to the Bank Receiving Entry’s Detail Page.
If the form was submit using the Submit & Add More button, the Screen will refresh with a blank form.
Case 2
Submitting the form via the Delete button will remove the Bank Receiving Entry and it’s Transactions, refunding each Account’s balance. The User will be redirected to the Bank Account’s Journal.
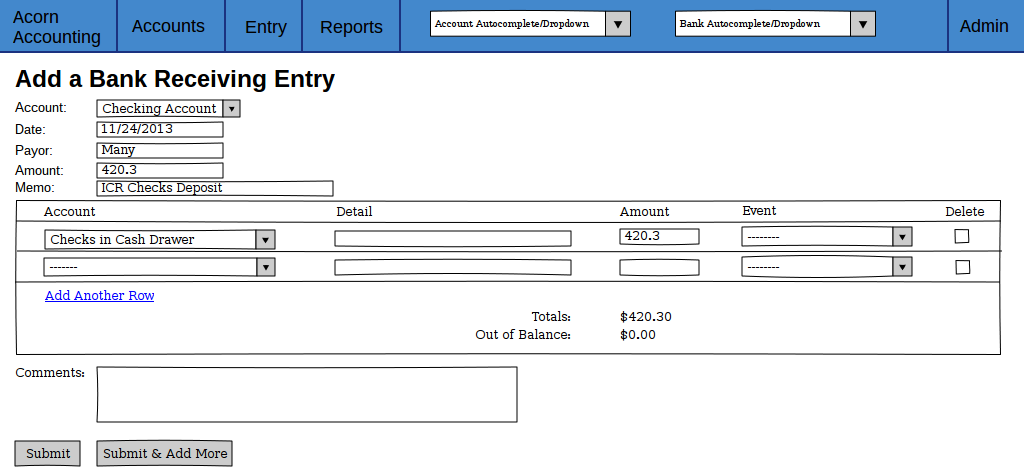
A Sample Add Bank Receiving Entry Page, showing a balanced deposit.
Add Bank Spending Entry
This Page is used to enter and update withdrawals from Bank Accounts.
Entry Conditions
Case 1
This Page is accessible through the Bank Receiving link in the Entry Sub-Menu.
Case 2
Clicking the Edit link in a Bank Receiving Entry’s Detail Page will direct the User to this Page.
Initial Conditions
This Page mimics the Add Journal Entry Page, except for some differences in fields.
The entry fields will also include an Account, Payee, ACH Payment, Check Number and Amount. The Accounts field will be limited to Accounts that are Bank Accounts. The Transaction table will contain a single Amount field instead of Credit and Debit fields.
Case 2
All inputs will contain the details of the Receiving Entry being edited.
A Delete button will be on the Page in addition to the 2 Submit buttons.
Intermediate Conditions
A Bank Account, Date, Amount, Memo and at least one Transaction is required. The entry must either be specified as an ACH Payment or have a Check Number. Check Numbers must be unique per Bank Account.
Checking a row’s Delete box will remove that row from the table.
Final Conditions
A valid form will create or update the Bank Spending Entry and the entered Transactions. The User will be redirected to the Bank Spending Entry’s Detail Page.
If the Entry is specified as Void, it’s Transactions are refunded and it’s Amount zeroed.
If the form was submit using the Submit & Add More button, the Screen will refresh with a blank form.
Case 2
Submitting the form via the Delete button will remove the Bank Spending Entry and it’s Transactions, refunding each Account’s balance. The User will be redirected to the Bank Account’s Journal.
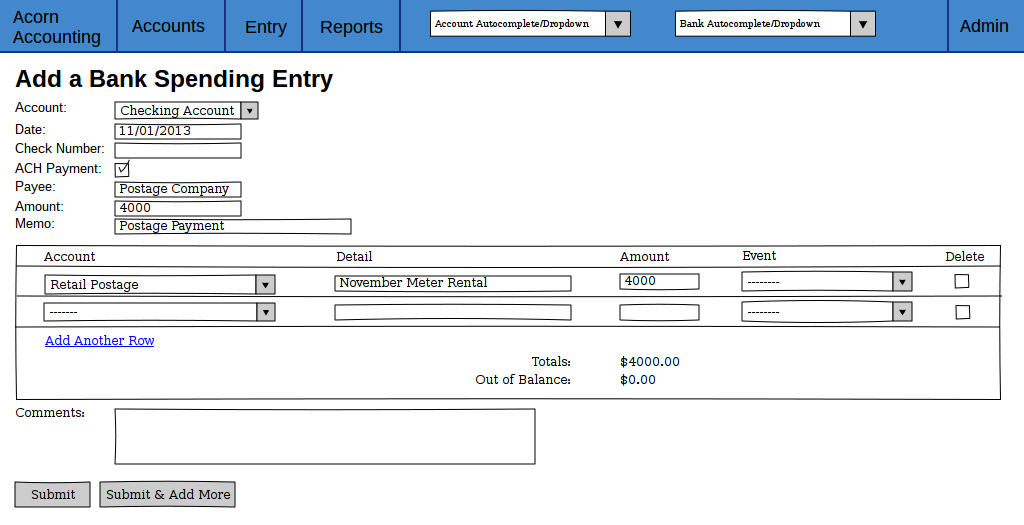
A Sample Add Bank Receiving Entry Page, showing a balanced ACH withdrawl.
Add Fiscal Year Page
This Page will be used to start new Fiscal Years, purging Transactions from previous years and resetting Income and Expense balances.
Entry Conditions
This Page is accessible through the New Fiscal Year link in the Admin Sub-Menu.
Initial Conditions
The Page will contain a Heading, explanation text and a form to enter the new Year’s details and select Accounts to exclude from purging.
The explanation text should describe the procedure of creating a New Fiscal Year and warnings of the irreversible deletions caused by starting a New Year.
The Fiscal Year Form will have fields for the Year, Ending Month and Period of the new Year. There will be a table containing all Accounts, with columns for checkboxes, the Account Names and Last Reconciled dates. Any Account that has been reconciled previously will default to being excluded.
Intermediate Conditions
If there is a pre-existing Fiscal Year, the new Year must be after the Ending Month and Year of the previous Year. The difference between the previous and new Year’s Ending Month and Year cannot be greater than the new Year’s period.
The Current Year Earnings and Retained Earnings Equity Accounts are required to have been created.
Final Conditions
If there is a pre-existing Fiscal Year:
- Historical Accounts will be created for the previous Year
- All Journal Entries that do not have unreconciled Transactions with Accounts selected in the Exclude table will be deleted
- The balance for all Income, Cost of Sales, Expense, Other Income and Other Expense Accounts will be set to zero at the beginning of the new year
- The balance of the Current Year Earnings Account will be transfered to the Retained Earnings Account
The User will be redirected to the Chart of Accounts.
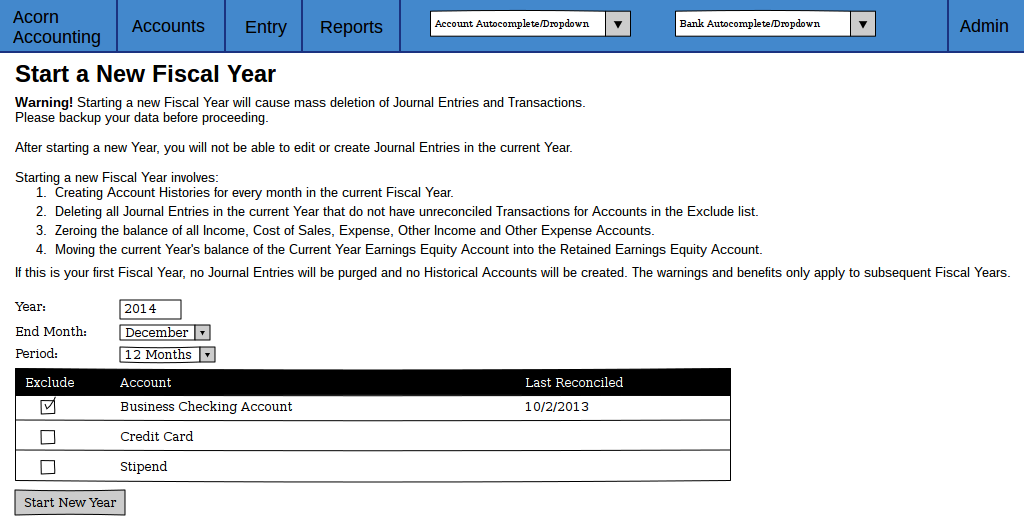
A Sample New Fiscal Year Page, showing the default of checking previously reconciled Accounts.